
by Tom Swords
On one of the last public evenings in October in 2017, I was at the Observatory with Jen and Dave Skitt to observe some double stars after we had closed. Dave and I noted that the focuser on the Hasting Byrne refractor was loose in the optical tube. Upon tightening the screws as best we could, it was still not stable.
Now, I am a long focal length refractor fan and know for certain that a loose fitting focusing assembly cannot provide the stable optical-mechanical alignment that is necessary to set and hold accurate collimation. Collimation in a refractor is simply defined as coaxial alignment of all optical-mechanical assemblies and having co-planar alignment of the objective lens surfaces to the eyepiece. In essence: centered and square.
I mentioned to Dave that I would like to investigate and see about repairing this assembly. I contacted and met with John Church, the curator of the instrument. He showed me a mechanical drawing of the scope and gave me a detailed oral history and recounted work that had been done to it. With that information and some additional investigation, I developed and then presented my plan at the October AAAP board meeting to seek approval to proceed with a repair. Approval was granted and on Nov 20th I began.
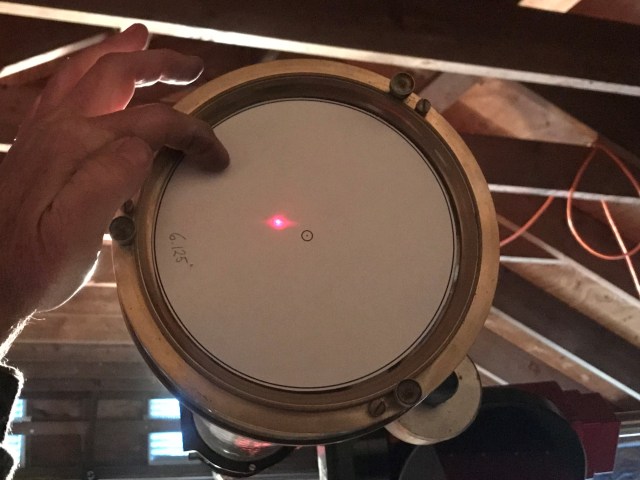
To start, I installed a laser collimator and noted where the optical centerline (laser dot) landed on the objective lens. The dot was where my finger tip is placed in the picture below. Think of that spot as the center of field seen at the eyepiece. It is far from the ideal optical-mechanical center.
We also observed that the collimation was not aligned. There should be a single point of light.
The Work Begins
The first step was to check and square the rear of the optical tube assembly (OTA) where the focuser is mounted. Upon correcting that and re-mounting the focuser, installing the laser collimator indicated that we had brought the mechanical centerline to within .75 inches of center. Quite an improvement however, the focuser was still not mechanically stable and centered in the tube.

At my home shop, I disassembled the focuser, cleaned and lubricated the mechanism and replaced the rubber tension washers. The interior of the focuser tube was repainted in flat black. The patina of the focuser was left as is with the exception of the maker’s marks.
Next up was the most challenging part of this project. Properly fitting the focuser to the optical tube.
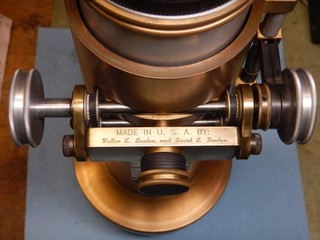
First, a bit of history is required. In 2002 the original focuser had mechanically failed and was replaced by the current focuser donated to AAAP from BD Instruments. It is a custom made Crayford style device weighing 12.5 lbs, constructed of brass, steel and aluminum. However, upon initial fitting in 2002, it was found that focus could not be reached. The OTA was shortened by 1 inch to achieve focus.
Also notable was that the original focuser mounted on the outside of the tube (i.e., the tube slipped inside the focuser). However, the shank of the replacement focuser mounts inside the tube, with machine screws drawing the tube tight to the shank.
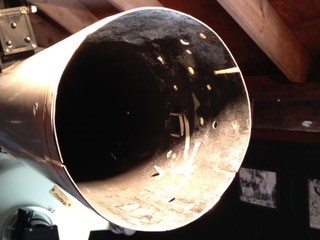
The Hastings Byrne OTA is tapered along its length; its diameter is greater in front (at the lens cell) to less in back (at the focuser). When shortened, one inch of the original round section of the OTA supporting the focuser was removed. The result was that part of the new focuser shank was no longer securely in contact with the tube walls. That is why the focuser would become “loose” over time. This can be thought of as a round cylinder inserted into a cone that opens wider.
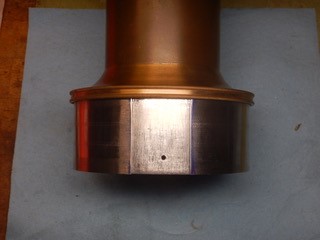
The OTA ID was measured to be .120” bigger than the shank of the focuser. In addition there was a soldered “lap seam” inside the tube. Unlike today’s seamless aluminum telescope tubes, telescopes constructed in the 1870’s were made in sections of steel or brass. The seams were then soldered with lead and the sections riveted together to form longer tubes.
So I set about constructing a “shim” of mild steel that would be fitted on the focuser shank in order to make up for the space in the larger section of the tube. It also would require a gap to accommodate the lap seam inside the tube. It was constructed from 16ga mild steel that was rolled and then ground to a custom fit between the shank and the ID of the OTA. The final thickness of the shim was .055” and that provided a .010” clearance fit to the tube.
The OTA itself had burrs and dents that were removed along with some gentle expanding to remove the taper of the tube and provide a closer fit of the focuser shank.
After many hours of grinding, trial fittings and adjustments, the shim and focuser were installed on Feb 14th for final trials. The original 6-32 sized fasteners were used initially. The hose clamp, shown in the photo, holds the shim in alignment on the shank while the whole piece is being inserted into the tube. The optical train was then laser aligned to be within .250” of center and the OTA was re-collimated using a refractor collimation tool.

The First Trial
On Sunday Feb 18th, Jen, Dave, my wife (Karen) and I went to the observatory for the trial run.
We decided to use double stars for testing. Viewing began with a 17MM eyepiece @136X. We started in Orion and all of us immediately noted how considerably brighter the views were. Despite the variable viewing conditions doubles were split very cleanly.
The Trapezium in M42 was perfect and if viewing conditions were better we might have seen the E & F components. We viewed 4 stars in Sigma Ori.
Meissa @4.5” separation was very sharp and defined.
Still in Orion, Jen steered us to HD 33055, a Mag9 double @ 2.4” separation that was split perfectly.
We went to Cancer and checked Iota Cnc and Tegmine. Beautiful.
Last target was Algeiba in Leo. I decided to test at high power to see if we could observe an “airy ring”. A 8mm eyepiece for 289X was used.
We observed two perfect spheres with first diffraction rings on each! The rings would come and go, break and reform as the atmosphere played above us. The trial was a success!
The following week, the focuser was removed and the shank was drilled and tapped for larger
10-32 button head socket screws that provide increased torque for mechanical stability. It was reinstalled on Feb 26th. The mechanical alignment was adjusted to be within .125” of center. The OTA was then re-collimated. The finder scope and grab handle were re-installed. Although there is still some cosmetic finish work to be completed on the tube, the telescope is ready for service.
On Feb 27th, Jen, Dave and I did some observation along with re-calibration of the T Point table in TheSkyX. This was done so as to correct the pointing of the mount since the optical center of the telescope had moved with the improved optical-mechanical alignment. Although sky conditions were less than ideal, observation showed that collimation was correct.

I feel privileged to have worked on this historic instrument and would like to thank the AAAP board and John Church for allowing me to do so. It’s ready to observe more of the Heavens and better than ever for its 200 year anniversary in 2079!

